
Now that we’ve covered the important background of GA4, data collection, and events, this chapter will show you how to get your property configured to start correctly sending data to it.
ACCOUNT STRUCTURE
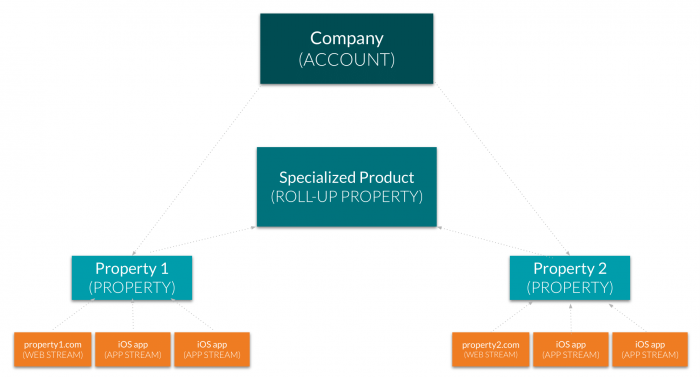
THE ACCOUNT
Each organization typically has one account that houses all of its properties. However, each account can house a mixture of up to 80 Universal Analytics and GA4 properties, subproperties, or roll-up properties. An organization that requires more than 80 properties can request a limit extension but may need multiple accounts.
PROPERTIES AND DATA STREAMS
Each source property typically represents one brand (which may span multiple domains or subdomains). Within each property, GA4 introduces new data streams. Each property may receive data from up to 50 data streams (websites, apps, etc.).
Every data stream you set up contains a unique measurement ID associated with your gtag or Google Tag Manager configuration. The data from each stream is combined into one property). Because GA4 adopted Firebase’s event-centric data model, a property can now include websites and mobile apps together (if the Firebase SDK tracks them). If you have data from multiple data streams in one property, two built-in dimensions will help you distinguish between them: Stream ID and Stream Name.

ROLL-UP PROPERTIES
A roll-up property is a particular type of property that combines the data from multiple (up to 50) source properties into a single property. For example, if you have several brands in separate properties that you want to see separately, but it would also help to view that data together, a roll-up property is a good option. Just like how it was for Universal Analytics, roll-up properties are only available for 360 customers.
Some important features to note:
- The cost for roll-up property events is one-half the cost of events in the source properties (based on the terms of your 360 contract)
- Data starts accumulating on the day of creation (no historical data before creation)
- Users are deduplicated if they are found across multiple source properties
- Google Signals must be activated in the roll-up property for source property Google Signals data to populate
- Source property data can be identified using the Source Property ID or Source Property Name dimensions
Actions you can take in a roll-up property:
- Add or remove users (not inherited from source property)
- Link to Google Ads
- Create custom dimensions and metrics
- Mark events as conversions
- Create audiences
Actions you can NOT take in a roll-up property:
- Create new events
- Create a sub-property
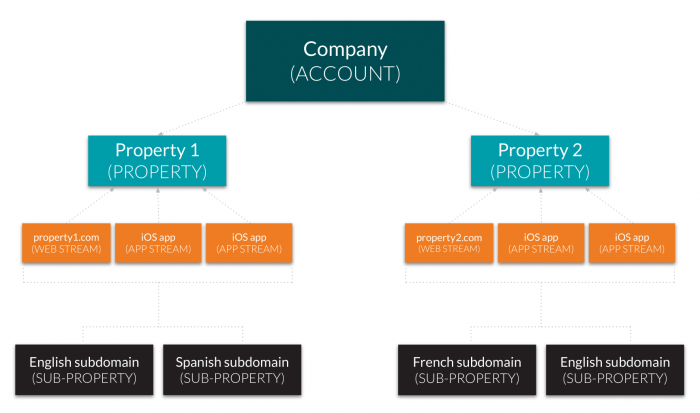
SUBPROPERTIES (A.K.A. THE REPLACEMENT FOR VIEWS)
A subproperty is a type of property that gets its data from one other property to govern user access to data and govern data by filtering events. This might be useful if you have several distinct user groups in one user experience. For example, you might need to have one domain with a distinct user flow that’s separated into subproperties for different subdomains, AND the user experience needs to be translated into varying languages. This is possible with subproperties.
Subproperties have replaced views in GA4. The two big differences that you need to know are 1) These are only available to 360 customers, and 2) Unlike Universal Analytics views, these are considered properties, which means that they are a part of your 80 property limit, and they have most of the functionality of a regular property (integrations, filters, audiences, etc.).
Some important features to note:
- Just like roll-up properties, the cost for sub-property events is one-half the cost of events in the source property (based on the terms of your 360 contract)
- Data starts accumulating on the day of creation (no historical data before creation)
Actions you can take in a sub-property:
- Add or remove users (not inherited from source properties)
- Mark events as conversions
- Create audiences
- Delete data
- Connect to Google Ads
- Import data except for offline data
- Create custom dimensions and metrics
Actions you can NOT take in a sub-property:
- Create new events
- Add or delete data streams
- Modify or Create events in UI
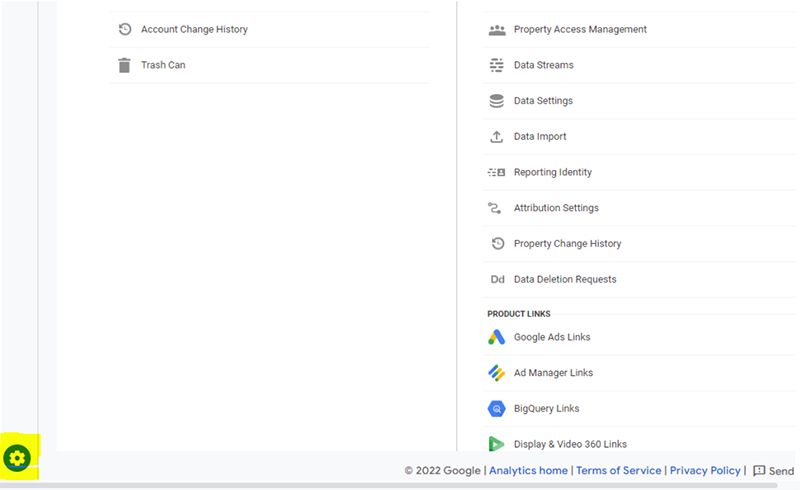
IMPORTANT ADMIN SECTION SETTINGS
You can find each of the features in this section by clicking on the gear button in the lower left-hand corner of your side panel:
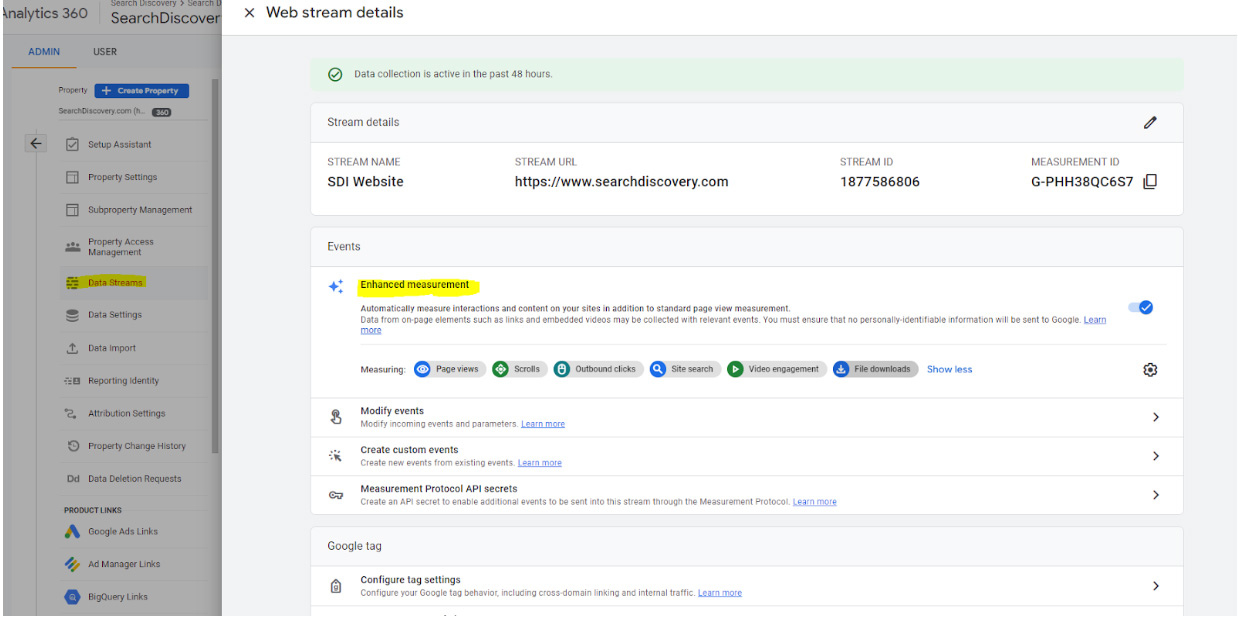
ENHANCED MEASUREMENT
GA4 provides some helpful enhanced measurement events—for websites only—that are tracked similarly across many brands. These are:
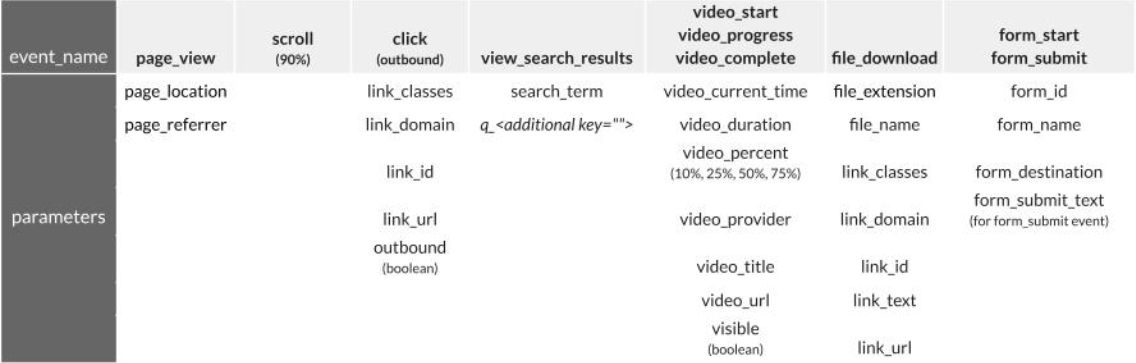
These are automatically enabled when the configuration associated with the data stream’s measurement ID is placed directly on the site using gtag or Google Tag Manager. Still, you do have the option to turn any or all of them off. I recommend doing this if you don’t plan on utilizing this data or if you plan to create a custom event in its place. Turning them off will reduce the overall size of the JavaScript file being downloaded on your browser. You can click on the gear icon in this section to do this. A view will appear, allowing you to toggle each event on or off.
You can configure additional options for page views and site search. For page views, If you click on advanced settings, you can turn on the ‘page changes based on browser history events’ option, along with page loads, which is helpful if your site is built as a single-page application.
Site search is automatically set up to capture the search term based on the URL’s q, s, search, query, or keyword parameter. However, if your search term is denoted with another URL query parameter, you can also make that change in the advanced settings. Find these settings here:
DATA SETTINGS
Google Signals
Google Signals is Google’s identity software that enables them to recognize users as they navigate across devices if they are logged into a Google account and if they have enabled ads personalization. It enables some powerful features within GA4, including the following:
- The ability for GA4 to identify users more accurately across devices
- Populating demographics and interest reports
- Collecting a greater quantity of user identification as cookies are phased out, which allows for more accurate conversion modeling and behavioral modeling where there are gaps.
This feature is not automatically enabled, so if you want to utilize its features, you’ll have to go into the ‘Data Collection’ section under ‘Data Settings’ and 1) Turn this setting on, 2) Customize regional settings based on your Legal department’s recommendation, and 3) Acknowledge the user data collection statement.
Data Retention
In the free version of GA4, your data retention setting is automatically set to two months. This means that you can only set your lookback window to two months. But don’t panic! There are 2 major caveats: First, This only applies to Explore reporting. Second, you can change this to 14 months if you go into the Data Retention section of your Data Settings.
Since GA4 relies heavily on Explore reporting to do real analysis in GA4, you may be concerned that you can’t look back past 14 months. Keep in mind that you can still utilize Google Data Studio and BigQuery (which has a free export option for even non-360 users in GA4) to look at a bigger window of historical data.
If you’re a 360 customer, you can adjust your data retention settings similarly, but you have longer lookback windows to choose from, the longest being 50 months.
Data Filters (Internal Traffic, Developer Devices)
There ARE still data filters in GA4 properties outside subproperties, but not at the same level as Universal Analytics views. While you need to use a sub-property to filter your data based on region, subdomain, etc., you can use the data filters in the admin section on properties to filter out the following:
Internal Traffic – GA4 automatically sets up a parameter for you called ‘traffic_type’ with a value set to ‘internal’ (you can change this value name). Any IP address that is set to have the value of “internal” will automatically be identified with the dimension of “Test data filter name” in reporting (if the ‘Testing’ filter state is chosen, which is the automatic setting) or not at all evaluated or included in reporting (if ‘Active’ is chosen).
To make this actually work, you will need to set up a rule identifying the specific IP addresses that you want to include or exclude within your data stream settings (click into your selected data stream > more tagging settings > define internal traffic).
Developer Traffic – GA4 allows you to exclude any event with the ‘debug_mode’ or debug_event parameter set to the value of ‘1’. This could be helpful if you had some event testing that you wanted to do outside of preview mode. The important thing to remember here is to remove the parameter when you want an event that you’re testing actually to transfer to your reports. Remember that you must enable this feature—it is not turned on by default. Read more about debug_mode here.
REPORTING IDENTITY
Your reporting identity is core to your initial GA4 setup and one of the biggest feature changes in this new version. You now have three different options to choose from that offer various different user identification methods:
Blended – This is the most comprehensive option that utilizes all of Google’s proprietary technology. This option identifies users in one of four ways (in order):
- User ID: This is the first and most accurate way that Google will try to identify a user. If your users can log in to your site or app, and you have assigned a user_id to them in your GA4 tags, this is how they will be identified.
- Google Signals: If enabled, this will identify users based on the Google Signals criteria above.
- Device ID: This is the legacy cookie-based option to identify users based on the device. This is the third option on the list because 1) It doesn’t identify the same user across different devices, and 2) Cookie tracking is becoming less viable for tracking users. On a browser, this is the Client ID based on the _ga cookie, and this value is from the app-instance ID on a mobile app.
- Modeling: If consent mode is in place that allows users to opt out of analytics cookies, it will cause gaps in your data. Google’s behavioral modeling can fill in these gaps by estimating the behavior of these users based on similar users who have accepted analytics cookies
Observed – This option identifies users by User-ID, Google Signals, and Device ID but does not use Modeling
Device-based – This ONLY identified users by Device ID and does not utilize User-ID, Google Signals or Modeling
ATTRIBUTION SETTINGS
Attribution settings allow you to choose how you want conversion credit assigned to your channel groupings, source, medium, campaign, etc. Chapter 11 covers this in more detail, but we’ll touch on the high-level choices you can make in this section.
You can choose from the following attribution models (definitions per Google):
Attribution models:
- Data-driven – Google’s machine learning capabilities evaluate which paths lead to conversions
- Last click – Ignores direct traffic and attributes 100% of the conversion value to the last tactic that the customer clicked (or engaged view through for YouTube) before converting.
- First click – Gives all credit for the conversion to the first channel a customer clicked (or engaged view through for YouTube) before converting.
- Linear – Distributes the credit for the conversion equally across all the channels a customer clicked (or engaged view through for YouTube) before converting.
- Position-based – Attributes 40% credit to the first and last interaction, and the remaining 20% credit is distributed evenly to the middle interactions.
- Time decay – Gives more credit to the touchpoints that happened closer in time to the conversion. Credit is distributed using a seven-day half-life. In other words, a tactic clicked eight days before a conversion gets half as much credit as a tactic clicked one day before a conversion.
- Ads-preferred last click – Attributes 100% of the conversion value to the last Google Ads channel that the customer clicked through before converting
Tip: The ‘Model Comparison’ report in the Advertising report suite is a beneficial tool to decide which model you want to use. It allows you to compare conversions using two of the models side-by-side.
Lookback windows:
You can also specify your lookback windows in this section. For example, if you have your attribution acquisition lookback window set to seven days, if somebody came into your site initially through a Google Ad (let’s say you have your attribution model set to first click), and the user converted after four days, Google Ads would get credit for that conversion. If that user came back on the ninth day through Organic Search and then converted, Organic Search would get credit for that conversion.
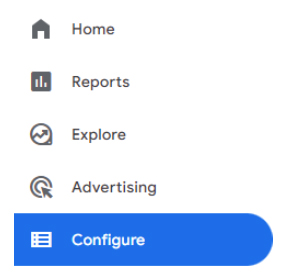
CONFIGURE SECTION SETTINGS
You can find each of the features in this section by clicking on the ‘Configure’ button in the top section of your side panel:
CUSTOM DEFINITIONS (SPECIFICALLY, CUSTOM DIMENSIONS)
You’ll want to set these up because in the data model GA4 uses, every event has a simple structure. We start with the event, which is what is actually happening (let’s say, for example, the event is ‘start_form’, when a user starts to fill out a form). But in most cases, we probably need more information to describe this particular event. So we use event parameters, which describe the event (for example, the type of form and the name of the form), and user properties, which describe the user who triggered the event (here we might collect the user type).
Custom dimensions are just parameters that you send with your custom events that you can see and use in your GA4 reporting. You will likely want to set all the parameters you send as custom dimensions. However, if you reach the custom dimension limit in GA4, you may still choose to send additional parameters to be stored and queried in BigQuery. These are even more important to plan and become familiar with now because we no longer have category, action, and label to describe events as in Universal Analytics.
How to set up Custom Definitions
To set these up, go into the ‘Custom Definitions’ tab of the ‘Configure’ section. You’ll start by putting the name of your dimension as you want it to appear in your reports, then you’ll choose how you want it to be scoped: either ‘event’ or ‘user.’. You’ll then add a description, and the parameter name that will coincide with your parameter name when you send the event.
Key differences between UA and GA4 CDs
Fewer scoping options – If you’re used to working in Universal Analytics, you might know that custom dimensions in that platform can also be set to be product-scoped or session-scoped, in addition to event- and user-scoped. These other options allow you to have a parameter persist across a session (for example, ‘login_status’) or a custom parameter persist for a product (for example, a ‘base price’ and ‘selling price’ to indicate a discount). In GA4, we don’t yet have the option to create session- or product-scoped custom dimensions (although a good amount of product, or ‘item’-scoped, parameters are built-in with enhanced e-commerce), but Google plans to add these in the future.
The index number is gone – Another difference you’ll notice if you’ve been using Universal Analytics is that custom dimensions are no longer associated with an index number. They are just identified with a name.
Character limit – You’ll also need to be mindful of the character limit for the values. The event-scoped custom dimension value can only be 100 characters long, and the user-scoped custom dimension can only be 36 characters long. If you go over this limit, it may cause issues in reporting. If you’re collecting a dynamic value that could run very long without you realizing it, it’s probably a good idea to put in some type of trim feature so that you stay within the limit.
Creation limit – Be mindful of how many custom dimensions you’re creating because there are limits, especially in the free version. In GA4 (free), you’re allowed 50 event-scoped and 25 user-scoped custom dimensions per property. If you upgrade to the paid GA360, you get 125 event-scoped and 100 user-scoped dimensions per property.
AUDIENCES
Creating audiences in GA4 is a way of grouping users, primarily for Google Ads targeting. While audience creation is possible using only Google Ads, Search Ads 360, and Display & Video 360 using first-party data or google-collected data (i.e., people who have been searching similar products on third-party sites), Audience creation in GA4 is especially powerful because it allows marketers to target people based on actions taken on their website or app (i.e., target people who have added a specific item to their cart on your website).
There are two other ways to group users—comparisons and segments— but audiences are the most important to think about as you’re getting your property started (if you’re utilizing Google Ads, Search Ads 360, or Display and Video 360) because these only start collecting data after they’re created.
How to set up Audiences
There are two different ways to set these up: Based on a segment or from scratch in the ‘Configure’ tab. Either way, you have the following options each time you create an Audience:
- Templates – Most of the time, you will probably want to create an audience from scratch, but Google does provide helpful starters. These templates include ‘Predictive’ which utilizes machine learning to identify users that are likely going to churn or purchase (these can only be used if you have enough data to support an accurate prediction).
- Condition scoping – If you have multiple conditions clarifying the types of users that you want to be in your audience, you can specify whether those events had to happen in the same session.
- Condition sequencing – You can make your audience specific to users who performed a certain event before or after another event. You can also set a time limit between performing these events using this option.
- Membership duration – This is automatically set at 30 days, but you can change this timeframe.
- Audience trigger – Creating this based on your audience adds to an event each time a new member joins that audience. This allows us to analyze how many users have joined that group over time.
Key differences between UA and GA4 audiences
You can save up to 100 of these audiences in the standard version of GA and up to 400 in 360. Remember that once you make an audience, you can only make changes to the name, but you can archive an audience and make a new one so that you don’t use up one of your slots with an audience you’re not going to use.
CONVERSIONS
In GA4, ‘Goals’ are out, and conversions are in. This name change comes with some changes in nature, as well as in implementation. However, their purpose remains the same: 1) to be able to report and understand what leads to a user performing the most important events on your website or app, and 2) to Optimize ads via Google Ads, Search Ads 360, Display & Video 360, and Campaign Manager 360 based on these user actions.
How to set up Conversions
To set these up, all you have to do is go into your ‘Configure’ tab, go to the ‘Events’ Page, and simply toggle your desired event on or off.
You’ll sometimes want to track a conversion based on a specific user action identified by a custom dimension in a more generic event. For example, you might have a ‘complete_registration’ event with a registration_type custom dimension that clarifies which registration funnel this applies to (maybe you have a registration on your site for both a webinar and a conference). Since you can’t clarify any parameter details in your conversion setup, if you wanted to make a conversion based only on conference registrations, you would have to create a new event using the new ‘Create Event’ feature or Google Tag Manager/gtag code.
You can also create a new conversion event in the ‘Conversion’ section, but it still only allows you to make a conversion based on an event name.
Key differences between UA and GA4 Conversions
In Universal Analytics, goals are based on a true/false question. Did this user action happen at least one time during this session? If true, then one goal completed. In GA4, however, all conversions are based on events (every time they happen). So, instead of one conversion per session, it is now one conversion per user action.
From an implementation perspective, Universal Analytics goals can also be based on an existing event, but you also have the ability to configure that goal based on the destination, duration, or pages per session. As mentioned above, GA4 requires you to make a new event if you need more context around your conversion.
CONCLUSION
Although this is not an exhaustive list of all the features and settings you can configure within GA4, keeping these in mind will be great as you start your GA4 migration (or implementation from scratch). If you want more in-depth information on some of the topics we went over, you can also check out our Youtube channel!


.png)
.png)
